
Halloween sugar cookies are a festive favorite that brings sweetness, creativity, and a touch of nostalgia to spooky season celebrations. Whether you’re baking for a Halloween party, a school event, or simply to enjoy with family, sugar cookies are the perfect canvas for eerie designs and colorful icing. In this article, we’ll dive deep into everything you need to know about Halloween sugar cookies from why they’re so loved to mastering the recipe, fixing common baking mistakes, choosing the best flour, and even crafting themed versions like “Snoop Dogg cookies.” We’ll also explore why Pillsbury Halloween cookies can be tricky to find, plus storage and prep tips for making them ahead of time. If you’re looking for more seasonal baking inspiration, check out these fall dessert ideas to keep your kitchen festive all autumn long.
Why Halloween Sugar Cookies Are a Seasonal FavoriteThe Appeal of Cut-Out Cookies in Halloween Shapes
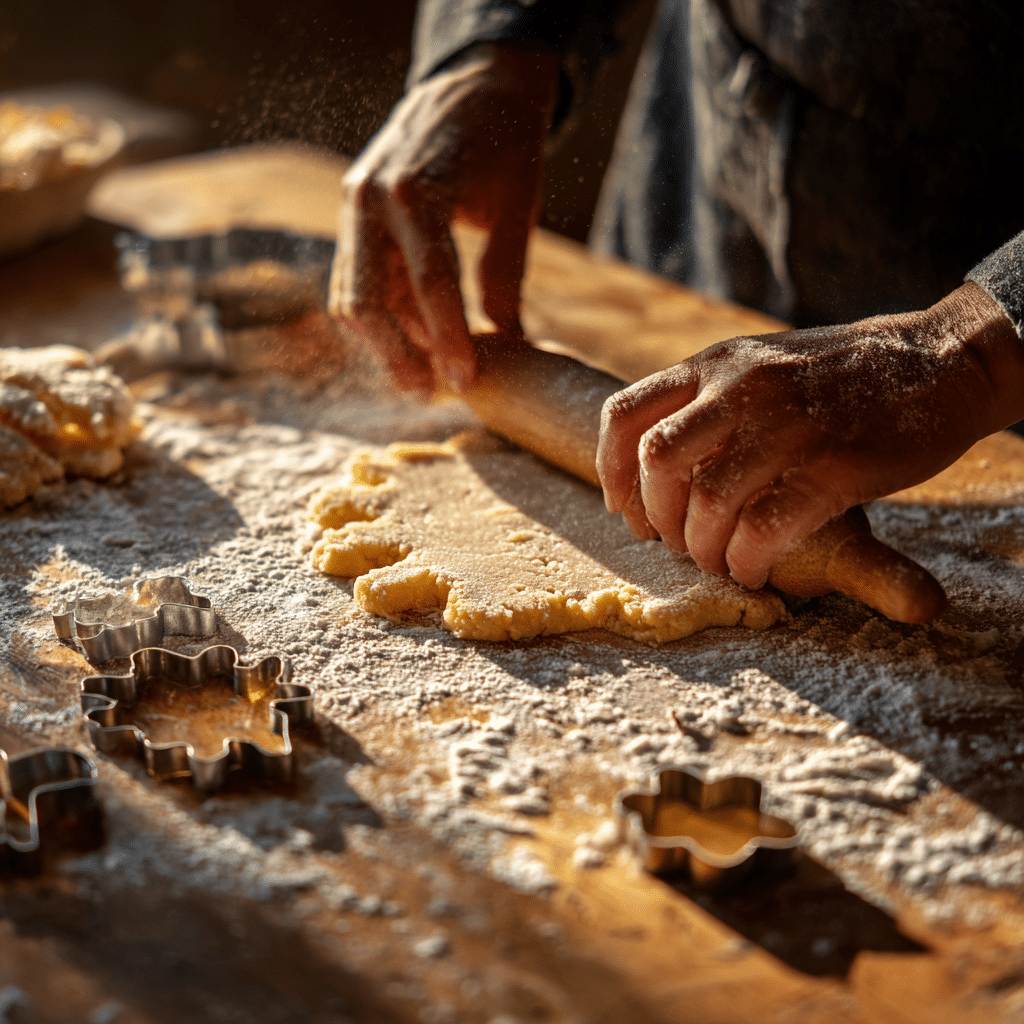
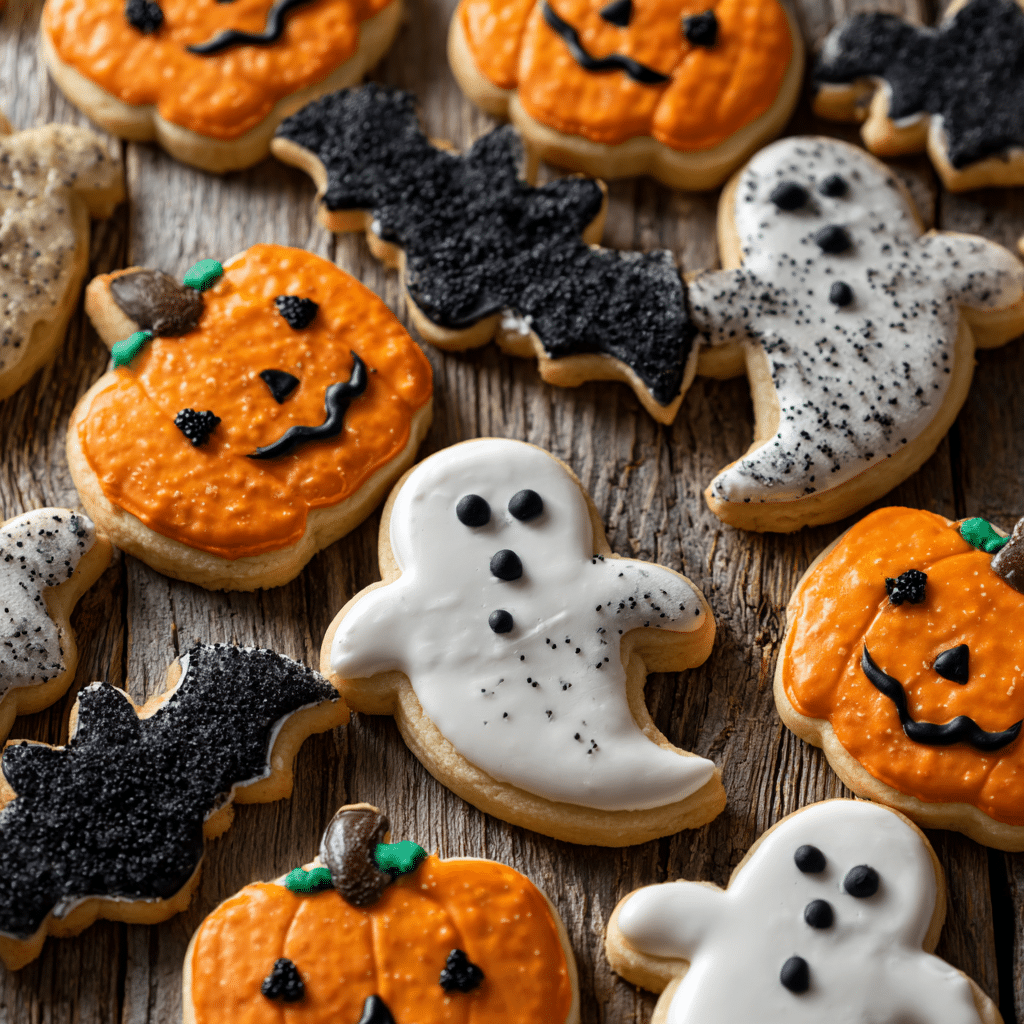
Every October, the excitement for baking Halloween sugar cookies rises as households dust off their pumpkin, bat, and ghost-shaped cookie cutters. These cookies aren’t just a dessert they’re a creative outlet. Kids love decorating them, while adults enjoy the nostalgia of this seasonal tradition. The smooth, buttery dough of sugar cookies makes them ideal for holding crisp edges, ensuring every spooky shape bakes to perfection. Add royal icing or colorful sprinkles, and they instantly become edible works of art.
Halloween sugar cookies also serve as versatile treats for parties and gifts. You can bag them individually for trick-or-treaters, arrange them on dessert tables, or use them as edible place cards for dinner events. Their charm lies in their adaptability they can be as simple or as intricate as your imagination allows.
Tradition, Nostalgia & Party Treats
The connection between Halloween and sugar cookies goes beyond flavor. Baking these cookies often marks the unofficial start of the holiday season. Families gather to roll out dough, decorate with frosting, and create sweet memories together. This blend of creativity and comfort is what makes Halloween sugar cookies a perennial favorite.
In the U.S., many households associate the scent of freshly baked sugar cookies with cozy fall evenings, pumpkin spice, and laughter echoing through the kitchen. It’s not just about sugar and flour it’s about tradition, togetherness, and celebration.
Pre-Made vs. From-Scratch Options
While store-bought options like Pillsbury Halloween cookies offer convenience, homemade versions give you total control over flavor and ingredients. From-scratch Halloween sugar cookies let you customize everything: sweetness level, texture, and decoration style. You can experiment with vanilla, almond extract, or even a hint of citrus zest to add complexity to your dough.
That said, pre-made cookie doughs are great time-savers for busy bakers. Pillsbury’s limited-edition Halloween cookies often featuring pumpkin or ghost prints bring festive spirit with minimal effort. However, since these are seasonal and tend to sell out quickly, homemade cookies remain the most reliable (and rewarding) choice.
Looking for inspiration? Try these easy Halloween recipes for more spooky baking ideas that pair perfectly with your sugar cookies.
Classic Recipe for Halloween Sugar Cookies
Halloween sugar cookies might look fancy, but they’re surprisingly simple to make once you’ve mastered the basics. The key to success is starting with a well-balanced dough one that holds its shape, bakes evenly, and tastes buttery with just the right amount of sweetness. Below, you’ll find the classic recipe that thousands of bakers rely on every October, plus step-by-step instructions and pro decorating tips to make your Halloween cookies shine.
Ingredients You’ll Need for Halloween Sugar Cookies
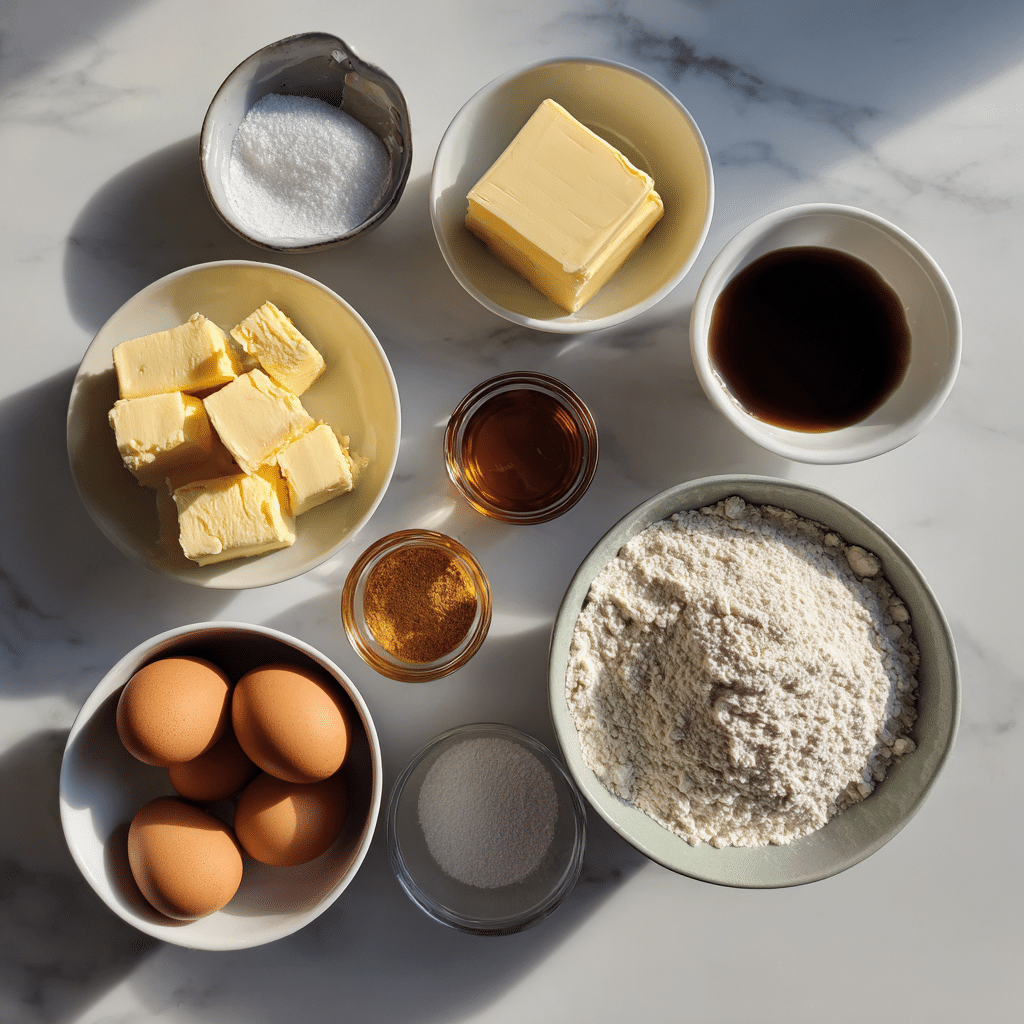
The beauty of sugar cookies lies in their simplicity. You probably already have most of these ingredients in your pantry. Here’s the base recipe for about 24 medium-sized cookies:
| Ingredient | Amount | Purpose |
|---|---|---|
| Unsalted butter (softened) | 1 cup (2 sticks) | Adds flavor and tenderness |
| Granulated sugar | 1 cup | Sweetens and helps create structure |
| Egg | 1 large | Binds ingredients together |
| Pure vanilla extract | 1½ teaspoons | Enhances flavor |
| All-purpose flour | 2¾ cups (plus extra for dusting) | Structure and texture |
| Baking powder | ½ teaspoon | Light lift |
| Salt | ½ teaspoon | Balances sweetness |
Optional flavor boosters: almond extract (¼ teaspoon), lemon zest, or pumpkin spice for a festive twist.
Step-by-Step Method: Cream → Mix → Chill → Roll → Cut → Bake
1. Cream the butter and sugar
Beat softened butter and sugar together for 2–3 minutes until light and fluffy. This step traps air, which creates a tender texture. Avoid rushing this it’s the foundation of your dough.
2. Add egg and vanilla
Mix in the egg and vanilla extract until just combined. If you’re adding other flavorings like almond extract or zest, do it now.
3. Combine dry ingredients
In a separate bowl, whisk together flour, baking powder, and salt. Gradually add to the wet mixture on low speed until a soft dough forms. The dough should be smooth but not sticky.
4. Chill the dough
Wrap the dough in plastic wrap and refrigerate for at least one hour (or up to 24 hours). Chilling is crucial it prevents spreading and makes it easier to cut precise shapes.
5. Roll and cut shapes
Preheat your oven to 350°F (175°C). Lightly flour your surface and roll the dough to about ¼ inch thickness. Use Halloween-themed cookie cutters (pumpkins, ghosts, bats) for fun shapes. Re-roll scraps carefully to avoid overworking the dough.
6. Bake
Transfer cookies to a parchment-lined baking sheet. Bake for 8 -10 minutes or until the edges are barely golden. Cool completely on a wire rack before decorating.
Pro Tip: If you prefer softer cookies, remove them from the oven just before the edges start browning. For crispier cookies, add an extra minute or two of baking time.
Decorating with Royal Icing, Flooding & Sprinkles
Now comes the fun part turning those cookies into Halloween masterpieces!
Royal icing is perfect for clean, defined designs. It’s made by whisking together powdered sugar, meringue powder, and water until smooth. Separate into bowls and color with gel food coloring orange, black, purple, and white are classics.
Use a piping bag with a fine tip to outline the cookie, then “flood” the inside with thinner icing for a glossy, smooth finish. Add candy eyes, sugar pearls, or colored sprinkles for texture.
If you prefer a more rustic look, use a simple glaze made from powdered sugar and milk, then add Halloween-colored sanding sugar while it’s still wet.
Looking for more design inspiration? Discover great ideas like easy royal icing tutorials to perfect your decorating game.
Storage Tips for Freshness
Store undecorated cookies in an airtight container at room temperature for up to one week. Decorated cookies last 3–5 days depending on the humidity. For longer storage, freeze undecorated cookies (layered with parchment paper) for up to 2 months. Thaw before icing.
If you’re baking ahead for a Halloween party, it’s best to bake and freeze the cookies, then decorate 1–2 days before the event for optimal freshness.
Troubleshooting & Common Cookie Mistakes
Even the most experienced bakers run into trouble with Halloween sugar cookies. From dough that spreads too much to cookies that turn hard overnight, it’s easy for small errors to impact the final result. But don’t worry every problem has a simple fix. In this section, we’ll look at the most common sugar cookie mistakes, why they happen, and how to troubleshoot them so your spooky treats turn out picture-perfect every time.
Why Cookies Spread, Crack, or Become Hard
Cookies spread too much:
This happens when your dough is too warm or has too much butter. Always chill your dough for at least one hour before baking. You can even pop cut-out cookies into the fridge for 10 minutes before they hit the oven.
Cookies crack on top:
Cracking is usually due to overbaking or using too much flour. To fix this, roll the dough evenly (¼ inch thick) and bake just until the edges start turning golden. Avoid overmixing, which can make dough dense and cause uneven rising.
Cookies become hard after cooling:
Hard cookies often mean they were baked too long. Sugar cookies continue to cook on the baking sheet after removal, so take them out while they’re slightly underdone. Store cooled cookies in airtight containers with a slice of bread to maintain softness.
Cookies lose their shape:
If your ghosts look like blobs, the dough wasn’t chilled long enough or had too much leavening. Reduce baking powder slightly and always chill shaped cookies before baking.
Over-Mixing, Wrong Oven Temp & Measurement Issues
Over-mixing the dough is a silent cookie killer. It develops gluten, making cookies chewy instead of tender. Mix only until ingredients are combined.
Incorrect oven temperature can make or break your cookies. Too hot, and they spread before setting; too cool, and they dry out. Always use an oven thermometer most ovens can be off by 15–25°F.
Measurement mistakes are another culprit. Measuring flour correctly (using the spoon-and-level method) ensures the right texture. Too much flour = tough cookies; too little = greasy, flat cookies.
Butter temperature matters too. It should be soft but not melted around 65°F is ideal. If it’s too soft, your dough will become oily and lose shape in the oven.
Tips to Salvage Cookies Mid-Bake
Even if you notice problems halfway through baking, all is not lost. Here’s how to save the day:
| Problem | Quick Fix |
|---|---|
| Cookies spreading too much | Place the baking sheet in the fridge for 5–10 minutes to firm up the dough. |
| Edges browning too fast | Lower oven temperature by 10–15°F and rotate the tray halfway through. |
| Uneven thickness | Roll dough between parchment sheets and use spacers for even height. |
| Cracks appearing | Brush with a little milk before baking for a smoother surface. |
| Flat cookies | Add 1–2 tbsp more flour to the next batch for structure. |
Pro Tip: Always test one cookie first before baking a full tray. It’s an easy way to catch issues before they ruin your whole batch.
How to Maintain Consistency Between Batches
If you’re baking multiple trays for a Halloween party or cookie exchange, consistency is key. Keep all dough portions the same thickness and size. Use a kitchen scale to weigh dough balls if needed. Always bake one tray at a time in the oven’s center rack for even heat distribution.
If you’re working with colored dough (like orange or black for Halloween), divide and tint portions before chilling. Food coloring can change dough texture slightly, so it’s best to mix thoroughly before refrigerating.
Looking for creative decorating ideas to match your flawless cookies? Check out fun Halloween cookie decorating tutorials for step-by-step inspiration.
Bonus Tip: How to Recover Overbaked Cookies
If your cookies come out too crunchy, don’t toss them! You can soften them by placing them in an airtight container with a slice of fresh bread or a damp paper towel (not touching the cookies). Within a few hours, the cookies will absorb moisture and regain softness.
For long-term storage, freeze overbaked cookies and crumble them later for ice cream toppings or pie crusts. Waste not, want not!
The Secret to a Good Sugar Cookie
Every baker has their own version of the “perfect” sugar cookie, but there’s a science behind achieving that melt-in-your-mouth texture and buttery sweetness we all crave especially when baking Halloween sugar cookies. The secret isn’t one single step; it’s a combination of precise measurements, proper chilling, and understanding how ingredients work together. In this section, we’ll explore what makes a sugar cookie truly great and how to master consistency in every batch.
Balance of Texture and Flavor: Chewiness vs Crispness
The best sugar cookies strike a balance between softness and structure. Too soft, and they fall apart; too crisp, and they lose their charm. Here’s how to control texture like a pro:
| Desired Texture | What to Adjust | Tip |
|---|---|---|
| Soft & Chewy | Use slightly less flour and bake a minute less. Add an extra egg yolk for richness. | Remove from oven before edges brown. |
| Crispy | Roll thinner dough (1/8 inch) and bake slightly longer. | Cool completely on a wire rack for crunch. |
| Balanced (Ideal) | Use the standard recipe, chill thoroughly, and bake 8–10 minutes. | Look for pale golden edges and set centers. |
Flavor balance also plays a role. Vanilla is classic, but adding a touch of almond extract or citrus zest enhances complexity without overpowering the cookie’s buttery base.
Role of Ingredients in Perfect Sugar Cookies
Every ingredient has a purpose. Understanding their roles helps you make small tweaks to customize your cookies perfectly.
- Butter: The backbone of flavor and texture. Always use unsalted butter so you can control salt levels. Room-temperature butter (around 65°F) ensures a smooth dough.
- Sugar: Granulated sugar gives cookies structure and crispness, while adding a tablespoon of brown sugar creates slight chewiness.
- Egg: Adds moisture and binds ingredients. For extra tenderness, use one whole egg and one yolk.
- Flour: All-purpose flour offers the ideal balance of protein for shape retention and tenderness.
- Leavening (Baking Powder): Provides light lift, but too much will cause puffiness and spread.
- Salt: Don’t skip it, it enhances sweetness and depth of flavor.
Pro Tip: Measure flour properly. Scooping directly from the bag packs it too tightly, leading to dense cookies. Always spoon and level for accuracy.
The Importance of Chilling the Dough
Chilling dough is non-negotiable if you want perfect Halloween sugar cookies. It allows the fat to solidify and the flour to hydrate, giving cookies their clean edges and smooth texture. Without chilling, dough spreads too fast in the oven, ruining your fun Halloween shapes.
- Chill for at least one hour for optimal structure.
- For best flavor, chill overnight slow fat solidification deepens richness.
- If you’re baking in batches, keep unused dough refrigerated while others bake.
If you’re short on time, flatten dough between parchment sheets and freeze for 20 minutes. This “quick chill” method is a great hack for busy bakers.
Handling and Rolling Dough the Right Way
Rolling dough may seem simple, but improper technique can make or break your cookies. Here’s how to get it right:
- Divide chilled dough into two portions to make rolling easier.
- Roll on a lightly floured surface or between parchment sheets for less mess.
- Keep an even ¼ inch thickness throughout.
- Lift and rotate dough occasionally to prevent sticking.
After cutting shapes, transfer cookies gently to the baking sheet using a thin spatula. If dough softens during cutting, refrigerate the shapes for 5–10 minutes before baking.
For extra precision, try using rolling pin guides or thickness rings perfect for uniform cookies that bake evenly every time.
Flavor Enhancements and Creative Twists
Want to elevate your sugar cookies beyond the basics? Try these subtle yet effective flavor upgrades:
- Add ½ teaspoon of almond extract for a bakery-style aroma.
- Mix in orange zest or pumpkin spice to complement the Halloween theme.
- Replace 2 tablespoons of flour with cornstarch for a more tender crumb.
- Use European-style butter for richer flavor and lighter texture.
Looking for more creative flavor pairings? Discover great ideas like seasonal cookie flavor combos to experiment with your next batch.
Pro Tip: Temperature Control Is Everything
Temperature consistency from ingredients to oven, is one of the biggest secrets to success. Use an oven thermometer to verify accurate baking temperatures, and always let your butter soften at room temperature (not melted). Cold dough + hot oven = sharp, clean shapes and a professional finish.
Why Pillsbury Halloween Cookies Can Be Hard to Find
Every fall, millions of cookie lovers head to grocery stores searching for those nostalgic orange-and-white Pillsbury Halloween cookies. Yet, year after year, shoppers complain they’re sold out weeks before Halloween. So, why are Pillsbury Halloween cookies so hard to find? The answer lies in their limited seasonal release, high demand, and distribution strategy. Let’s unpack each factor and what you can do to score a box before they disappear again.
If you love nostalgic treats, check out our roundup of classic fall desserts for more old-school seasonal favorites you can make at home.
Limited Edition Seasonal Release
Pillsbury Halloween sugar cookies are part of the brand’s Ready to Bake!™ holiday collection, which rotates seasonally (Halloween, Thanksgiving, Christmas, Valentine’s Day, Easter). This means production only runs for a short period typically late September through October.
Because of this limited release window, once a retailer sells out, there’s no restock until the next year. Pillsbury intentionally creates scarcity to heighten excitement and maintain demand. It’s the same marketing strategy used for holiday cereals or pumpkin spice lattes seasonal exclusivity keeps consumers coming back.
According to Pillsbury’s own statements, these cookies are produced “in special batches” that align with themed packaging runs and promotional campaigns. That makes them inherently rare and collectors of festive foods love that nostalgia factor.
High Demand and Rapid Sellouts
Halloween is the second most profitable holiday for the baking industry, and Pillsbury cookies are one of the top-selling items in the refrigerated dough category. Many stores underestimate demand, leading to early sellouts.
Online discussions, including Reddit threads and TikTok videos, show fans posting when they spot Pillsbury Halloween cookies sometimes buying multiple boxes to freeze for later. The combination of nostalgia, convenience, and social media hype fuels faster sellouts every year.
Retailers also report that Halloween-themed cookies outsell other seasonal products by up to 60%, meaning limited supply meets explosive demand.
Pro Tip: If you want to snag a box, check larger retailers like Walmart or Target in early October or sign up for restock alerts on grocery delivery apps.
Distribution & Supply Chain Limitations
While Pillsbury is a household brand, seasonal product distribution isn’t always uniform. Some regions receive more Halloween inventory based on sales history and logistics routes. That’s why you might find them easily in one state but not another.
Factors that affect availability include:
- Regional production schedules: Plants prioritize certain markets.
- Retailer stocking decisions: Smaller stores often skip limited runs.
- Transportation delays: Refrigerated items require cold-chain logistics, which can limit reach.
- Promotional timing: Some stores stock early for local events or sales promotions.
These factors combine to create inconsistency so even when Pillsbury announces their return, not every shopper sees them on shelves.
DIY Alternative: Pillsbury-Inspired Halloween Sugar Cookies
If you can’t find the official Pillsbury Halloween cookies, it’s easy to make your own version with the same charm and taste.
- Use the classic sugar cookie dough recipe (from Part 2).
- Before baking, press a festive design into the dough pumpkin faces, ghosts, or spiderwebs using cookie stamps or stencils.
- Add a few drops of orange and black food coloring for that signature Pillsbury look.
- Bake, cool, and decorate with royal icing for that nostalgic finish.
Not only will you get the same soft, buttery cookie, but you’ll also have creative control over every detail plus, no store runs required.
Pillsbury’s 2024 – 2025 Updates
In recent years, Pillsbury has experimented with limited-time packaging, partnerships with Halloween movies, and small-batch releases. Some stores carry exclusive designs (like ghosts or pumpkins with new prints) depending on region.
However, the company continues to keep these cookies special by avoiding year-round production ensuring they remain a true seasonal treasure.
If you’re craving that Pillsbury-style softness, you can replicate the texture by slightly underbaking your homemade cookies and storing them in airtight containers for 24 hours before serving.
Fun Variations “Snoop Dogg Cookies” and More
Once you’ve mastered the classic Halloween sugar cookies, it’s time to get creative. Themed cookies have become a centerpiece of modern celebrations especially those with a playful, pop-culture twist. Among the most talked-about designs recently are “Snoop Dogg cookies”, inspired by the rapper’s iconic laid-back personality and viral collaborations with brands like Martha Stewart and Dunkin’. But you don’t need celebrity status to create cookies with personality. This section shows how to design, flavor, and style your sugar cookies for any Halloween vibe, from chill to spooky glam.
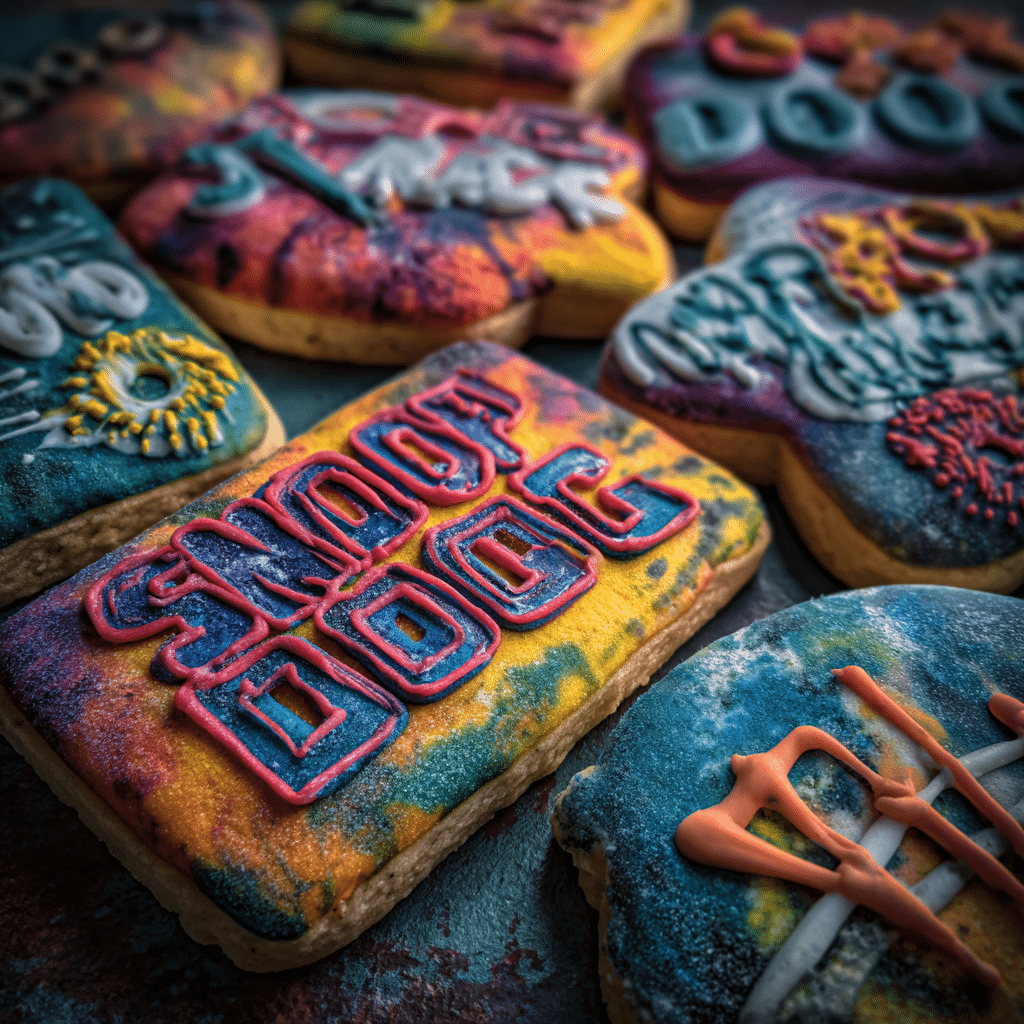
What Are “Snoop Dogg Cookies”?
The term “Snoop Dogg cookies” has become a fun nickname for cookies inspired by Snoop’s personality cool, colorful, and a bit mischievous. These can be sugar cookies decorated with his image, logo, or playful cannabis-themed humor for adult Halloween parties. But in family-friendly versions, they’re simply hip, colorful, and full of fun.
Here’s how to make your own version:
- Use your base sugar cookie recipe (from Part 2).
- Add food coloring to sections of your dough for a tie-dye effect think purples, greens, golds, and blues.
- Roll the dough gently together for a marbled look.
- Use round cutters and bake as usual.
- Once cooled, decorate with royal icing, edible gold dust, or printed edible images.
If you want the full “Snoop aesthetic,” use edible markers or icing to write cheeky messages like “Stay Chill” or “Fo’ Shizzle.” These cookies are always a hit at adult Halloween gatherings.
How to Add Pop-Culture Flair to Your Halloween Sugar Cookies
Halloween is the perfect excuse to mix spooky with trendy. Here are a few creative ways to turn ordinary sugar cookies into conversation starters:
| Theme | Design Idea | Decoration Tip |
|---|---|---|
| Classic Horror | Dracula, mummies, and ghosts | Use black and red icing with white fondant details. |
| Pop Icons | Snoop Dogg, Taylor Swift, or Barbie | Use edible image transfers or stencils for faces. |
| Cartoon Fun | Scooby-Doo, Minions, or Addams Family | Outline characters with icing pens and food coloring. |
| Luxury Halloween | Gold-dusted pumpkins or marble ghosts | Use edible glitter, metallics, and royal icing layers. |
For an easy project with kids, use pre-colored icing pens to decorate baked cookies like a coloring book. It’s less messy than liquid icing and encourages creativity.
Looking for visual inspiration? Check out these celebrity-themed cookie tutorials that will help you design showstopping creations.
Creative Flavor Variations for Your Halloween Cookies
Beyond appearance, you can also switch up flavors while keeping that iconic sugar cookie texture. Here are some exciting twists:
- Chocolate Sugar Cookies: Replace ¼ cup flour with cocoa powder for a rich chocolate version.
- Pumpkin Spice Sugar Cookies: Add ½ teaspoon pumpkin pie spice and a hint of molasses.
- Matcha Sugar Cookies: Add 1 tablespoon matcha powder for a green hue and earthy taste.
- Lemon or Orange Twist: Use citrus zest to balance sweetness with brightness.
- Funfetti Cookies: Fold in orange and black sprinkles before baking for Halloween flair.
Pro Tip: If you use flavored extracts (like mint or almond), cut back slightly on vanilla to avoid overpowering the base flavor.
Decorating “Snoop Dogg Cookies” Like a Pro
To give your themed cookies a professional edge:
- Outline first: Use thicker royal icing for clean edges.
- Flood with color: Thin icing slightly with water for a smooth finish.
- Add highlights: Use contrasting colors for facial features, text, or sunglasses.
- Set with shine: Once dried, brush cookies with a touch of luster dust or shimmer.
- Let dry completely: Stack only after icing is firm to avoid smudging.
Want to make your cookies Instagram-worthy? Arrange them on a neutral background with props like mini pumpkins, gold leaves, or vinyl records for a stylish Snoop-inspired vibe.
Other Fun Variations to Try This Halloween
Halloween sugar cookies can take any direction your imagination leads. Try these other themed ideas:
- “Monster Mash” Cookies: Mix purple and green dough, press in candy eyes before baking.
- “Zombie Bites”: Drizzle red icing like “blood” for a creepy-cool effect.
- “Witch’s Brew” Cookies: Add black cocoa powder and top with edible glitter.
- “Glow-in-the-Dark” Cookies: Use neon food colors and UV-reactive edible paints for parties.
For more unique twists, discover great ideas like adult Halloween cookie recipes that mix fun with sophistication.
Pro Tip: Combine Themes for a Custom Cookie Set
If you’re baking for a big event, combine styles like a “Snoop Dogg Halloween Party Pack” featuring tie-dye cookies, pumpkins with gold shades, and bats wearing sunglasses. It’s quirky, unexpected, and a guaranteed conversation starter.
How Early Can You Bake Your Sugar Cookies?
When preparing for Halloween parties or bake sales, timing is everything. You want your Halloween sugar cookies to taste fresh, look flawless, and stay soft without feeling rushed on the big day. The good news? Sugar cookies are one of the most storage-friendly desserts out there. With the right planning, you can make them several days or even weeks in advance without sacrificing flavor or texture. Let’s explore the best methods for prepping, storing, and decorating your cookies ahead of time.
Making Dough in Advance: Refrigeration & Freezing Tips
Refrigerating Sugar Cookie Dough:
You can make your dough up to 3 days in advance and store it in the refrigerator. After mixing, divide the dough into two disks, wrap tightly in plastic wrap, and place it in an airtight container or zip-top bag. Before using, let it sit at room temperature for 10–15 minutes—just until pliable enough to roll out.
Freezing Sugar Cookie Dough:
For longer storage, freeze the dough for up to one month. Label each batch with the date to keep track. When ready to bake, transfer dough to the fridge overnight to thaw. Avoid microwaving frozen dough it can melt unevenly and alter texture.
Pro Tip: Flatten dough into discs before freezing so it thaws evenly and takes up less space.
How Long Before an Event You Can Bake Sugar Cookies
Here’s a quick reference guide for timing your Halloween baking prep:
| Stage | How Far in Advance | Storage Method | Notes |
|---|---|---|---|
| Dough (unbaked) | 2–3 days | Refrigerate | Bring to room temp before rolling |
| Dough (frozen) | Up to 1 month | Freeze airtight | Thaw overnight in fridge |
| Baked (undecorated) | 5–7 days | Airtight container | Layer with parchment paper |
| Decorated cookies | 2–3 days | Airtight at room temp | Avoid humidity for icing stability |
This means you can easily bake your cookies several days before your Halloween party and decorate closer to the event without losing quality.
Best Storage Techniques for Freshness
To keep your cookies soft and flavorful:
- Cool completely before storing. Warm cookies release steam that creates condensation, making them soggy.
- Layer with parchment paper. Stack cookies in airtight containers with parchment between layers.
- Keep away from moisture. Humidity can soften icing or make sprinkles bleed. Store cookies in a cool, dry place.
- Use bread slices. Adding a slice of sandwich bread to the container helps maintain moisture balance replace every two days.
If freezing baked cookies, skip the icing until after thawing. Frosting may crack or sweat when thawed from frozen.
Decorating Cookies in Advance
If you’re decorating your cookies ahead of time, consider these tips:
- Use royal icing for long-lasting designs it hardens beautifully and can be stored for days.
- Avoid buttercream if storing at room temperature; it softens too easily.
- Allow decorated cookies to dry for 12–24 hours before stacking or packaging.
- Store in a cool, airtight container away from sunlight to prevent icing discoloration.
For gift packaging or cookie sales, heat-sealing each decorated cookie in its own bag ensures freshness and a professional finish.
How to Refresh Cookies Before Serving
If your cookies have been stored for several days, you can revive them with a few simple tricks:
- Place cookies in a container with a slice of apple or bread for a few hours to restore softness.
- Warm undecorated cookies in a 300°F oven for 3–4 minutes to refresh texture.
- Avoid microwaving this causes uneven heating and chewy spots.
For crisp sugar cookies, bake an additional minute the first time or leave the lid slightly ajar during storage to maintain crunch.
Freezing Decorated Cookies (Advanced Tip)
Freezing decorated cookies is possible if done correctly. Once the icing is completely dry, layer cookies between sheets of parchment and place them in an airtight, freezer-safe container. When ready to serve, thaw at room temperature without opening the container to prevent condensation from forming on the icing.
This slow-thawing method helps maintain flawless designs and prevents sticky surfaces.
Pro Tip: Plan a Halloween Cookie Baking Schedule
To avoid last-minute chaos, use this timeline as a guide:
| Day | Task |
|---|---|
| Monday | Make and chill dough |
| Tuesday | Roll, cut, and bake cookies |
| Wednesday | Decorate with icing and sprinkles |
| Thursday | Package cookies for event |
| Friday/Saturday | Party day serve and enjoy! |
Planning ahead not only reduces stress but also allows you to enjoy the creative side of cookie decorating without the time crunch.
Best Flour & Ingredient Choices for Cookies
Choosing the right ingredients especially the flour can make or break your Halloween sugar cookies. The difference between a cookie that’s soft and buttery versus one that’s dry and crumbly often comes down to how your ingredients interact. While sugar cookies are simple by nature, small adjustments can dramatically improve taste, texture, and consistency. In this section, we’ll cover the best flour for cookies, how other ingredients affect baking, and a few professional tips for upgrading your recipe without losing that classic flavor.
Understanding the Role of Flour in Sugar Cookies
Flour provides structure, but not all flours are created equal. Each type contains a different protein level that determines how much gluten develops when mixed with liquid and fat. More gluten means tougher cookies; less gluten creates tenderness.
| Flour Type | Protein Content | Effect on Cookies | Best For |
|---|---|---|---|
| All-Purpose Flour | 10–12% | Balanced structure and softness | Traditional sugar cookies |
| Pastry Flour | 8–9% | Tender, delicate texture | Softer sugar cookies |
| Cake Flour | 6–8% | Ultra-soft but less shape stability | Thinner, melt-in-mouth cookies |
| Bread Flour | 12–14% | Too chewy and dense | Not recommended |
| Gluten-Free Mix | Varies | Works with xanthan gum for structure | Gluten-free alternatives |
Verdict: All-purpose flour remains the gold standard for Halloween sugar cookies because it strikes the perfect balance enough strength to hold spooky shapes but tender enough to stay soft.
Pro Tip: If you prefer ultra-soft cookies, substitute ¼ cup of your all-purpose flour with cake flour.
The Butter Factor: Flavor and Texture Control
Butter isn’t just fat it’s flavor. Using the right butter (and temperature) can make a big difference.
- Unsalted butter: Always use unsalted so you can control salt levels precisely.
- European-style butter: Contains more fat and less water, resulting in richer flavor and creamier dough.
- Salted butter: Adds unpredictable saltiness best avoided unless adjusting the recipe.
- Room-temperature butter: Should be slightly cool to the touch (around 65°F). Too warm leads to spreading; too cold causes uneven mixing.
If you love deep flavor, brown half your butter first. It adds a nutty aroma and golden color perfect for autumn baking.
Sugar Choices and Their Effects
Sugar does more than sweeten it affects moisture, color, and texture.
| Sugar Type | Effect on Cookies |
|---|---|
| Granulated Sugar | Creates structure and crisp edges |
| Brown Sugar | Adds moisture and chewiness |
| Powdered Sugar | Produces a tender, crumbly texture |
| Raw or Cane Sugar | Adds crunch and deeper flavor |
For Halloween sugar cookies, granulated sugar gives the best structure for cut-outs, while a touch (1–2 tablespoons) of brown sugar adds a subtle chew.
Additives That Perfect Texture: Cornstarch, Cream of Tartar & More
Professional bakers often use small ingredient tweaks to elevate basic dough:
- Cornstarch: Softens texture and reduces spreading (use 1–2 tsp per cup of flour).
- Cream of Tartar: Adds light tang and enhances structure.
- Baking Powder vs. Baking Soda:
- Baking Powder gives lift and a lighter crumb.
- Baking Soda promotes browning and slight crispness.
Most sugar cookie recipes benefit from baking powder alone.
Adding a pinch of cream of tartar gives your cookies a subtle tang and helps them stay soft longer a secret many bakeries use.
Eggs, Flavorings, and Secret Enhancers
Eggs bind ingredients and add moisture. Using one whole egg plus an extra yolk creates a richer, softer cookie. Avoid adding more whites they can make cookies dry.
Flavorings like vanilla extract, almond extract, or citrus zest add depth. For a stronger aroma, use pure vanilla extract instead of imitation.
Secret Enhancers:
- A pinch of instant espresso powder intensifies vanilla flavor (without tasting like coffee).
- A few drops of food-grade glycerin can help retain softness in decorated cookies.
- A teaspoon of milk or cream in the dough improves tenderness.
Best Ingredient Combinations for Different Goals
| Goal | Flour Type | Butter Style | Sugar Mix | Bonus Add-In |
|---|---|---|---|---|
| Soft & Chewy | All-purpose + 1 tbsp cornstarch | European-style | ¾ granulated + ¼ brown | Extra yolk |
| Crispy Edges | All-purpose | Regular unsalted | 100% granulated | Add ½ tsp baking soda |
| Bakery Style | Mix of all-purpose & cake flour | Browned butter | ¾ granulated + ¼ powdered | Almond extract |
| Long Shelf Life | All-purpose | Regular butter | 100% granulated | Cream of tartar |
Each small change helps you tailor the final product to your preference, whether you want bakery-style perfection or simple family-friendly cookies.
Pro Tip: Use Quality Ingredients for Better Results
High-quality butter, pure extracts, and fresh flour matter more than you think. Old flour can taste stale, and imitation vanilla can leave a chemical aftertaste. Always check expiration dates and store dry ingredients in airtight containers away from humidity.
FAQ Key Questions Answered
As we wrap up this ultimate guide to Halloween sugar cookies, it’s time to address the most common baking questions home bakers ask every fall. Whether you’re wondering why Pillsbury cookies vanish from shelves, how to make your dough perfect every time, or how far in advance to prep your treats, these expert answers will ensure your cookies look and taste amazing every single batch.
Why Are Pillsbury Halloween Cookies Hard to Find?
Pillsbury’s Halloween sugar cookies are a seasonal product, released only during September and October. The company produces them in limited runs to build excitement and exclusivity similar to holiday cereals or pumpkin spice drinks. Because demand is extremely high, many stores sell out early and don’t restock.
at Is the Secret to a Good Sugar Cookie?
The secret lies in balance, precision, and temperature control:
- Cream butter and sugar thoroughly for lightness.
- Measure flour accurately to avoid tough dough.
- Chill your dough for at least an hour before baking.
- Don’t overmix once flour is added.
- Bake just until edges turn golden no longer.
Perfect sugar cookies are soft in the center, slightly crisp at the edges, and have a delicate buttery flavor. Small details, like using fresh ingredients and not skipping the chilling step, make all the difference.
How to Make “Snoop Dogg Cookies”?
“Snoop Dogg cookies” are a fun, creative spin on traditional sugar cookies often colorful, laid-back, and party-friendly. To make them:
- Prepare your sugar cookie dough.
- Add food coloring (purple, green, gold) and gently swirl for a tie-dye effect.
- Cut or shape cookies using round cutters.
- Bake and decorate with royal icing, edible gold dust, or playful designs.
They’re perfect for adult Halloween parties or themed events. For a fun twist, use edible markers to write humorous quotes or lyrics.
How Many Days Before an Event Can You Make Sugar Cookies?
You can bake sugar cookies several days ahead of time with proper storage:
- Dough: Refrigerate for up to 3 days or freeze for up to 1 month.
- Baked (undecorated) cookies: Store in airtight containers for up to 7 days.
- Decorated cookies: Keep in airtight containers for 2–3 days at room temperature.
If freezing, always let cookies cool completely before wrapping. For decorated cookies, let icing dry fully before packaging or freezing.
What Are Common Cookie Mistakes?
Even experienced bakers make cookie errors. The most common ones include:
- Overmixing the dough – develops gluten and causes toughness.
- Skipping the chill step – leads to spreading and misshapen cookies.
- Incorrect oven temperature – too high burns edges, too low dries them out.
- Improper measuring – especially flour (use spoon-and-level method).
- Overbaking – remove cookies when edges just turn golden.
To fix overbaked cookies, place them in a sealed container with a slice of bread or apple for a few hours they’ll soften up beautifully.
What Is the Best Flour for Cookies?
For classic sugar cookies, all-purpose flour is the best choice. It provides the ideal structure for cut-out cookies while maintaining softness. If you want a more tender texture, blend all-purpose flour with a little cake flour (about ¾ to ¼ ratio).
Avoid bread flour it has too much protein and produces chewy, dense cookies. Pastry flour is excellent for a delicate, melt-in-your-mouth finish if you’re after a softer bite.
Pro Baker’s Quick-Answer Table
| Question | Short Answer |
|---|---|
| Why are Pillsbury cookies rare? | Limited seasonal release & high demand. |
| Secret to a perfect sugar cookie? | Chill dough + precise measuring. |
| How to make Snoop Dogg cookies? | Tie-dye dough + bold decorations. |
| How far ahead can I bake? | Up to 7 days for baked cookies, 3 days for dough. |
| Common baking mistakes? | Overmixing, overbaking, wrong temps. |
| Best flour type? | All-purpose for balance, pastry for softness. |
If you still have questions or want professional guidance on decorating, discover great ideas like cornbread muffins
Perfect, now let’s wrap it up with your Conclusion, followed by all SEO Rank Math elements, image prompts, schema markup, and social media captions for your full Rank Math–optimized article on Halloween Sugar Cookies.
Conclusion: Mastering Halloween Sugar Cookies Like a Pro
Halloween sugar cookies aren’t just treats they’re a tradition. From baking with family to creating themed party snacks, these buttery, sweet cookies are the heart of spooky season celebrations. Whether you follow the classic recipe, try a fun variation like “Snoop Dogg cookies,” or even craft a Pillsbury-inspired batch, success comes down to the basics: precision, patience, and passion.
Remember to chill your dough, measure ingredients accurately, and bake until edges are barely golden. With the right ingredients and a little creativity, your cookies will not only taste delicious but also impress guests with festive designs and colors.
For even more seasonal dessert ideas, check out our baking collection featuring pumpkin breads, caramel treats, and apple pie twists that perfectly complement your Halloween sugar cookies.
Halloween Sugar Cookies
Ingredients
Equipment
Method
- Cream the softened butter and granulated sugar together for 2–3 minutes until light and fluffy.
- Mix in the egg and vanilla extract (and almond extract or citrus zest if using) until just combined.
- In a separate bowl, whisk together the all‑purpose flour, baking powder, and salt.
- Gradually add the dry ingredients to the wet mixture on low speed, mixing until a soft dough forms (avoid overmixing).
- Wrap the dough in plastic wrap and refrigerate for at least 1 hour (or up to 24 hours) to firm up.
- Preheat oven to 350 °F (175 °C). On a lightly floured surface (or between parchment), roll the dough to about ¼‑inch thickness.
- Use Halloween‑theme cookie cutters (pumpkin, ghost, bat, etc.) to cut shapes and transfer them to a parchment‑lined baking sheet.
- Bake for 8–10 minutes, or until the edges are barely golden. Let the cookies cool completely on a wire rack before decorating.
- Decorate with royal icing, colored glazes, sprinkles, or edible art once cookies are fully cooled.